 button. To open the Edit Group page to edit an existing group in the My Groups tab, select the Edit
  option in the Action column.
The Add Group button will open the Create New Group page. The Create New Group page is used to create a group of Target Channels so the stations can easily be selected together for a Campaign, or for live now displaying activity viewing. The Edit button in the Action menu of the My Groups tab will open the Edit Group page. The Edit Group page is used to edit an existing Group to change the information and Target Channels in the group. The Create New Group and Edit Group pages work the same and have the same fields.
Click for help links for this topicClick for help links for this topic
Select the Groups option from the Navigation pane. To open the Create New Group page, click the Add Group button. To open the Edit Group page to edit an existing group in the My Groups tab, select the Edit option in the Action column.
Click any area for help.

Click any area for help.
The Group Name is used to identify the stations that will be in the group. This name will be shown in the Custom search when adding Target Channels to Campaigns. This name can be 64 characters in length. This is a required field.
The Description field is optional and can be used to further describe the group. This description can be 128 characters in length.
A Group created by the user can be set with a Public  or Private
  Access Level. When a Group is Public it will be available to other users in the same organization. Users can edit or delete any public group. If the Group is set to Private, only the user that created the group will see and have access to that group. This is a required field.
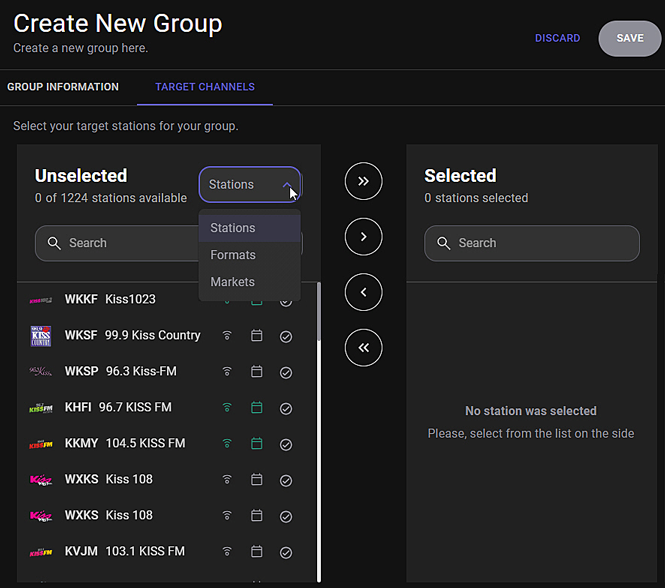
The Target Channels tab is used to select channels for the Group. Channels can be selected by Stations, Markets and Formats. The Target Channels in Groups works similar to the Target Channels in a Campaign.
Click any area for help.
Click any area for help.
The default view of the Unselected pane is by Stations. Channels can be selected by Stations, Markets or Formats. Use the drop-down to switch to Stations, Markets or Formats.

The Search field can be used to narrow the list of results of the stations listed in the Unselected section. The Search section can be used to search for Stations, Markets or Formats depending on the method selected using the drop-down. Use the search field to narrow the list of results. Enter the Call Letters, Market, Format, or key word to narrow the results. The results change as the search text is typed.

The Search field is also found in the Selected pane allowing for the list of selected Channels to filtered.
The buttons in the middle, between the Unselected and Selected panes can be used to add or remove stations from the group. Select an active available station from the Unselected list, then select the add  button to move the station to the Selected pane. To add multiple stations, use the CTRL or SHIFT keys to select multiple stations then use the add button to move the stations to the Selected pane. Optionally, use the Add All
  button to add all available stations. To removed a station from the Selected list, select the station, then select the remove
  button to move the station to the Unselected pane. To remove multiple stations, use the CTRL or SHIFT keys to select multiple stations then use the remove button to move the stations to the Unselected pane. Optionally, use the Remove All
  button to move all the stations in the Selected pane to the Unselected pane.
The Selected pane shows the station that are selected for the Group. The list of stations in the selected pane show the status of the station. The status shows if AudioDisplay is active  or inactive
  for the station and if the station is allowed
  to be assigned to a campaign or not allowed
  . The Channels icon shows if the destination channels (send HD and send RDS) are enabled
  or disabled
  . At least one channel (send HD or send RDS) must be enabled for Channels to show allowed.

AudioDisplay, Campaigns, and the send HD and send RDS channels are enabled in the Station Settings window. To removed a station from the selected list, select the station, then select the remove button to move the station to the Unselected pane. To remove multiple stations, use the CTRL or SHIFT keys to select multiple stations then use the remove button to move the stations to the Unselected pane. Optionally, use the Remove All button to move all the stations in the Selected pane to the Unselected pane.
The Discard button is available when Adding or Editing a Group. To discard the changes, click the Discard button in the top right corner of the page. A prompt is shown allowing the changes to be discarded. Click YES to discard any changes or NO to close the window and return to the underlying Group.

The Save  button is enabled when all required fields are entered and at least one station is selected for the group. Click the Save button to save the group.
 |
The following steps can be used to Add a Group: |
button.
button to move the stations or group of stations to the Selected pane. Optionally, use the CTRL or SHIFT keys to select multiple Stations Market or Formats, and then use the add button to move the stations or group of stations to the Selected pane. Optionally, use the Add All button to add all the custom groups in the list. button to move the station to the Unselected pane. To remove multiple stations, use the CTRL or SHIFT keys to select multiple stations then use the remove button to move the stations to the Unselected pane. Optionally, use the Remove All button to move all the stations in the Selected pane to the Unselected pane. button. |
The following steps can be used to Edit a Group: |
 option to open the Edit Group page.
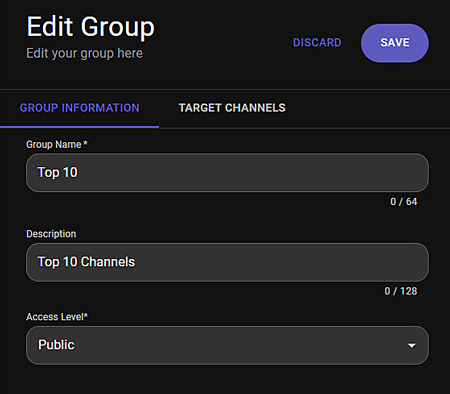 button to move the stations or group of stations to the Selected pane. Optionally, use the CTRL or SHIFT keys to select multiple Stations Market or Formats, and then use the add button to move the stations or group of stations to the Selected pane. Optionally, use the Add All button to add all the custom groups in the list. button to move the station to the Unselected pane. To remove multiple stations, use the CTRL or SHIFT keys to select multiple stations then use the remove button to move the stations to the Unselected pane. Optionally, use the Remove All button to move all the stations in the Selected pane to the Unselected pane. button.
© Copyright 2022 - 2026 AudioDisplay. All Rights Reserved.