
A Campaign is a way to advertise a block of spots or a specific spot with AudioDisplay. Campaigns in AudioDisplay control what is delivered to the HD or RDS destination when a spot or spot block is playing.
A Campaign can run for a single day, a time range, or a date range and contains the required text, and image if the destination supports it. Campaigns can be edited as required, but their timezone cannot be changed once the campaign starts. Campaigns can also be duplicated, which creates an exact copy except for the Flight dates. Time Zone and Target Channels. A Campaign can be ended immediately, the End Campaign will set the end date to today and sets the Campaign to inactive.
Click for help links for this topicClick for help links for this topic
Navigation bar
Navigation Pane
Using Search field to find a Campaign
Select the Campaigns option from the Navigation pane.
Click any area for help.
Click any area for help.
The Search field can be used to narrow the list of results of the Campaigns list. Enter the Advertiser, Campaign Name or Status to narrow the results. The results change as the search text is typed. Select a Campaign to open the Campaign Details window.

To Filter the View of the Campaign list by schedule dates, click the filter view  button. Click the calendar
  in the Start or End Date fields to open a calendar control. The End Date uses the same calendar controls as the Start Date, but also has defined Presets that can be selected for the date range. Optionally Include or exclude ended campaigns in the list.

Click the Filter button  again to cancel the filter view.
The Start and End Date fields set the date range of the Campaigns being viewed. The default start date is the current date. Click in the field and type in the date or use the calendar control to open the calendar to change the date range.

Use the arrows  in the calendar to the right of the Month and Year to change the month in the currently selected year.
Use the drop-down arrow next to the month and year in the calendar to easily change the year and month selected for the date.

Use the Clear in the calendar to clear the date field. Use the Today option to set the date to the current date.
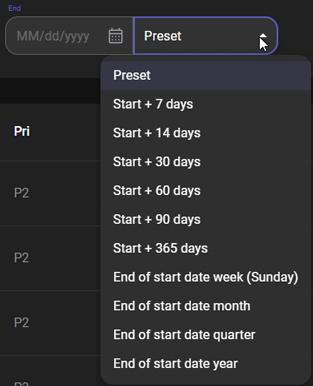
The End Date uses the same calendar controls as the Start Date, but also has defined Presets that can be selected. Click the drop-down arrow next to the Preset option to view and select the defined presets available.
Use the Include ended campaigns option to include or exclude the campaigns that have ended within the specified filter date range. Ended Campaigns are excluded by default.

Simply click the slider to include the ended campaigns. When the slider is blue and moved to the right the ended campaigns will be included if they are within the specified date range.

When finished selecting a date range click the Apply button. This updates the Campaign list to use the specified range thus allowing the Ended, Active and Scheduled campaigns to be viewed.
When the Add Campaign  button is selected it will open the Create Campaign page.
The Campaign list shows the active and scheduled campaigns. Use the Search to narrow the list of Campaigns or use the or Filter View to view the Campaigns for a date range. Each row of the list shows the campaign and some of its details. Simply click a campaign row to open the Campaign Details with a preview of the displaying data. The Campaign can be easily ended from the Campaign Details window. The Campaign Details pane also allows the campaign to be duplicated, edited or deleted.
Click any area for help.
Click any area for help.
Below the search and the number of campaigns found, is a list of campaigns that match the search or filter criteria. Simply select a Campaign to open the Campaign Details window. The following information is displayed for each campaign.
Ad Image - The Ad Image is uploaded in step 1 of the New, Edit or Duplicate Campaign window. The image is used for HD stations.
Advertiser - The Advertiser is the company sponsoring the spot break. The Advertiser is added to the Campaign in step 1 of the New, Edit or Duplicate Campaign window.
Campaign Name - The Campaign Name is the name or description of the Campaign. This could contain the Advertisers name and an ad slogan for the company, with up to 256 characters in the name. This is shown in the Station AudioDisplay window when the Campaign has an active schedule.
Pri - Pri stands for Priority. This column shows the priority of a Campaign with the Delivery Type of Block.
Schedule Dates - The Start and End columns show the schedule dates for the Campaign.
Timezone - The Timezone column shows the Timezone that is being used for the campaign.
Status - The Status column of the campaign row shows the status of the Campaign. The status could be one of the following:
 button in the Campaign Details window and the Campaign is currently not active for any station. An Ended Campaign can be Duplicated
  .
. , Edited
  or Duplicated ..
Action - The Action column allows the Campaign to be Edited or Duplicated. Click the Edit button to open the Edit Campaign page. Click the Duplicate button to open the Duplicate Campaign page.
Using Search Campaign to find a Campaign
Using the Filter View to find a Campaign
 |
The following steps can be used to get familiar with the Search in the Campaigns window: |
|
The following steps can be used to get familiar with the Filter View in Campaigns: |
button to open the Filter View window. button to open a calendar control to select a start date.
to the right of the Month and Year to change the month in the currently selected year.
button to open a calendar control to select an end date.
© Copyright 2022 - 2026 AudioDisplay. All Rights Reserved.